Azure API Management – API Policy for high availability and disaster recovery

Hi All,

In this post I would like to demonstrate how we’ve achieved high availability and disaster recover policies for Azure services (Function App, Web API, Logic App etc) deployed in Primary and Secondary region.

APIM_Tier

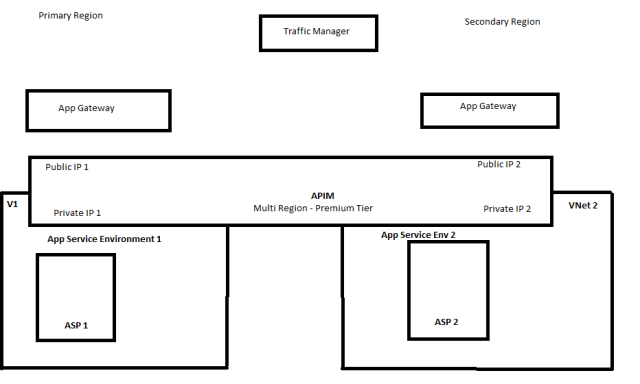
Traffic Manager -> Traffic manager is sitting on the top of DNS router – it just does the transfer the API call to the API Gateway.

API Gateway -> It verifies API endpoint, it can have specific format of hosting to validate the right external calls. App gateway transfer all the call to the public Azure API Management.

Azure API Management – > APIM is multi region premium tier, with primary and secondary instance. APIM is one entity with two copy running on primary and secondary region. APIM sends to the request to it closest region, for example if the request
is routed from the primary region then the API Gateway will transfer it to the public IP of APIM hosted in primary region. We always send the traffic to one side of APIM.
We’ve APP service environment sitting in Primary and Secondary under VNET1 and VNET2 respectively, so we’ve a copy of our Azure services (Function App, Web API, Logic App) running on both Primary and Secondary region of APP service environment.
In general, on a regular day everything will be routed to the primary region. If there is unavailability of components in Primary region of app service environment, the call will be routed to the azure services in app service environment in secondary region. So this is how it is replicated to primary and disaster recovery side.
So for secondary side to be used, we’ve implemented API policy in such a way, if there is failure in Azure services in App service environment in primary region, the call will re-direct to the Azure services in App service environment in secondary region.

This will allow us to implement High Availability and Disaster Recovery. So how to achieve this in APIM policy :

<policies>
<inbound>
<base />
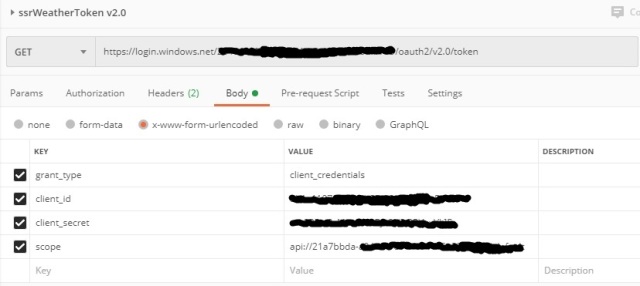
<authentication-managed-identity resource="{{clientid}}" ignore-error="false" output-token-variable-name="" />
<choose>
<when condition="@(context.Deployment.Region.Equals("region name", System.StringComparison.InvariantCultureIgnoreCase))">
<set-backend-service base-url="https://{{webapi-primaryhostname}}" />
<cache-lookup-value key="is-primary-down-cache-key" default-value="@((bool)false)" variable-name="is-primary-down" />
<choose>
<when condition="@((bool)context.Variables["is-primary-down"])">
<set-backend-service base-url="https://{{webapi-secondaryhostname}}" />
</when>
</choose>
</when>
<when condition="@(context.Deployment.Region.Equals("region name", System.StringComparison.InvariantCultureIgnoreCase))">
<set-backend-service base-url="https://{{webapi-secondaryhostname}}" />
<cache-lookup-value key="is-secondary-down-cache-key" default-value="@((bool)false)" variable-name="is-secondary-down" />
<choose>
<when condition="@((bool)context.Variables["is-secondary-down"])">
<set-backend-service base-url="https://{{webapi-primaryhostname}}" />
</when>
</choose>
</when>
</choose>
</inbound>
<backend>
<retry condition="@(context.Response.StatusCode == 404 || context.Response.StatusCode == 403 || context.Response.StatusCode == 503)" count="2" interval="1" first-fast-retry="true">
<choose>
<when condition="@(context.Response != null && (context.Response.StatusCode == 404 || context.Response.StatusCode == 403 || context.Response.StatusCode == 503) )">
<choose>
<when condition="@(context.Request.Url.Host.Equals("{{webapi-primaryhostname}}"))">
<set-backend-service base-url="https://{{secondaryhostname}}" />
<cache-store-value key="is-primary-down-cache-key" value="@(true)" duration="{{drroutinginterval}}" />
</when>
<when condition="@(context.Request.Url.Host.Equals("{{webapi-secondaryhostname}}"))">
<set-backend-service base-url="https://{{webapi-primaryhostname}}" />
<cache-store-value key="is-secondary-down-cache-key" value="@(true)" duration="{{drroutinginterval}}" />
</when>
</choose>
</when>
</choose>
<forward-request />
<choose>
<when condition="@(context.Response != null && (context.Response.StatusCode == 200))">
<choose>
<when condition="@(context.Request.Url.Host.Equals("{{webapi-primaryhostname}}"))">
<cache-remove-value key="is-primary-down-cache-key" />
</when>
<when condition="@(context.Request.Url.Host.Equals("{{webapi-secondaryhostname}}"))">
<cache-remove-value key="is-secondary-down-cache-key" />
</when>
</choose>
</when>
</choose>
</retry>
</backend>
<outbound>
<base />
</outbound> 
</policies>

Here, if there is a failure (http status code 404, 403, 503 ) with the primary host “<set-backend-service base-url=”https://{{webapi-primaryhostname}}” />” retry condition will be executed, policy will call secondary host “<set-backend-service base-URL=”https://{{secondaryhostname}}” />” and set this secondary host in cache. Now, any subsequent API call will check if there is already base-url in cache it will use this base URL (in this case it is the secondary host) and redirect the call to secondary host. Cache will hold this value until seconds provided in the named-value {{drroutinginterval}}.

Thanks.

Secure web api using OAuth 2.0 with Azure active directory and APIM

This post will take through the steps of registering an application in Azure Active Directory and securing the App Service using API Management (APIM), shows you how to configure your Azure API Management instance to protect an API, by using the OAuth 2.0 protocol with Azure Active Directory (Azure AD).

Process to secure APIM using OAuth 2.0 with Role Based Access Control (RBAC) and APIM to App service using Managed Identity

Step 1 : Creating App Registrations on the Microsoft Identity platform (Azure AD)

Types of App Registrations setup in Azure AD

→ Consumer Client App (Caller )

→ APIM App Registration

→ App Service Registration 

Step 2 : Register App Service Application Registration in Azure AD.

→ The App Registration will enable the Web-API to enable AD Authentication and Authorization.

→ Make sure to use “express mode” to select the App Service Registration in web-api.

Express mode Permission

→ Set scope to make sure another AAD registered application to access the App services.

App Service Set scope

Visit this link for more details to register App Services and APIM App Registration process in Azure AD and in that follow step number 1.

This is required for each environment (non-prod, stage and prod), and for each team.

Step 3 : Register APIM App Registration and configure API level “App Roles” at AD level.

→ Granting Application Permissions to APIM App to implement role-based access control (RBAC) granted at an Azure AD level.

→ For this, we need go to the APIM App Registration and edit its Manifest.

APIM App Roles

→ Set relevant API based “App Roles” there.

Set API manifest permissions

→ Set “Application ID URI” in Expose an API property.

APIM Expose an API

Visit this link for more details to register App Services and APIM App Registration process in Azure AD and in that follow step number 2.

This is required for each environment (non-prod, stage and prod).

Step 4 : Register client application (consumer-client-app) in Azure AD that needs to call APIM API services.

→ Client App Registration will enable client to implement OAuth based access to APIM.

→ Each consumers will have their own App Registration App ID, Secret and Resource ID is the APIM-AppID to be passed.

→ In case token is generated using v2.0 token endpoint, instead of “Resource ID” “Scope” will be used.

V2.0 Token

Refer to following link to know more about Microsoft identity platform (v2.0) overview https://docs.microsoft.com/en-us/azure/active-directory/azuread-dev/azure-ad-endpoint-comparison

Step 5 : Set “Application Permission” on consumer-client-app.

→ Go to “API Permissions” property and select “Add Permission → Application Permission – > My API” to give access to required APIs.

→ Permission are given to READ or POST to an API or API’s.

Client App Service Add API Permissions

→ This enables role based access permission at Azure AD level to the client ID.

Step 6 : Validate-jwt policy to check against role-based access in a consumer-client-app token.

 In the Inbound section, select All Operations and add below policies below below <base /> keyword. 

              You can use the Validate JWT policy to pre-authorize requests in API Management, by validating the access tokens of each incoming request. If a request does not have a valid token, API Management blocks it.

<validate-jwt header-name=”Authorization” failed-validation-httpcode=”401″ failed-validation-error-message=”Unauthorized. Access token is missing or invalid.”>

<openid-config url=”https://login.microsoftonline.com/{tenantId}/.well-known/openid-configuration” />
<required-claims>
<claim name=”aud” match=”any”>
<value>api://<guid></value> <!–APIM App ID when you use scope–>
<value><value></value> <!–APIM App ID when you use resource ID–>
</claim>
<claim name=”roles” match=”any”>
<value><productname>.v1.ReadAndWrite</value>
</claim>
</required-claims>

</validate-jwt>

Step 7 : Set policy to use “Managed Identity” so AAD will take care of authentication and authorization of App Service from APIM.

<inbound>
<authentication-managed-identity resource=”<resourceId/ClientId>” ignore-error=”false” output-token-variable-name=”” />
</inbound>

App Services and APIM App Registration process in Azure AD

Hi All,

This post is to describe and take through the steps to set up App Registrations for App Services and API Management using OAuth 2.0 with Azure Active Directroy.

  1. App Registration in AAD for securing App Services (WebApps and FunctionApps) using OAuth 2.0 with Azure active directory

This App registration is for securing the App Services, and should be used by the consumers (registered on AAD) to access the respective WebAPIs and Functions.

  1. Sign into Azure Portal.
  2. Select App registration
  3. Select New Registration.
  4. Name the Application as “nonprod-<team>-appsvc-appreg” , where <team> will be organisational domain  etc.
  5. Click Register.

Create App Registration

6. In the newly created App Registration, select “Manifest” property.

Select Manifest APIMClientID (2)

7. In that section set the following oAuth2 permission in the manifest modifying “oauth2Permissions” element of JSON representation.

“oauth2Permissions”: [
{
“adminConsentDescription”: “Allows another AAD registered application to access the App services”,
“adminConsentDisplayName”: “Access App Services”,
“id”: “8jca6c61-0762-7b99-a1e1-e4bdf7e6e165”,
“isEnabled”: true,
“lang”: null,
“origin”: “Application”,
“type”: “User”,
“userConsentDescription”: “Allows another AAD registered application to access the App services”,
“userConsentDisplayName”: “Access App Services”,
“value”: “user_impersonation”
}
],

8. “Save” the App Registration changes. This also creates a scope associated to the App Registration.

9. Similarly follow the same for Staging and Production as per shown tabular column.

Non – Production
Staging
Production
App Service App Registration Name

Note:- This App Registration Client ID can be used when consuming any of the Web Apps and Function Apps in HIP

nonprod-<team>-appsvc-appreg stage-<team>-appsvc-appreg prod-<team>-appsvc-appreg
oauth2Permissions Use the above snippet as it is.

Id as given above.

Use the above snippet as it is.

Replaced Id with correct Id

Use the above snippet as it is.

10. Add user accounts as “App Owner” to this App Registration

2) App Registration in AAD for API Manager (APIM) to secure APIs using OAuth 2.0 with Azure active directory

This App registration is for the APIM which creates the necessary roles that should be used by the consumers to access the APIs.

  1. Select App registration
  2. Select New Registration.
  3. Name the Application as “nonprod<companyname>-apim-appreg
  4. Click Register.
  5. Select “Expose an API” and set “Application ID URI”

APIMClientID_ExposeAPI

6. Select Manifest.

Select Manifest APIMClientID (2)

7. In that section set the following oAuth2 permission in the manifest modifying “appRoles” element of JSON representation as shown below.

“appRoles”: [
{
“allowedMemberTypes”: [
“Application”
],
“description”: “Allow client apps to perform read and write operations on <name>.v1 API.”,
“displayName”: “<name>.v1.ReadAndWrite”,
“id”: “da9a6ab2-bc67-4213-102c-07d5749ea2s3,
“isEnabled”: true,
“lang”: null,
“origin”: “Application”,
“value”: “<name>.v1.ReadAndWrite”
},
{
“allowedMemberTypes”: [
“Application”
],
“description”: “Allow client apps to perform read operation on <name>.v1 API.”,
“displayName”: “<name>.v1.Read”,
“id”: “8ceee182-dcd0-48b3-af69-1a7924dc9d15”,
“isEnabled”: true,
“lang”: null,
“origin”: “Application”,
“value”: “<name>.v1.Read”
}

]

}

8. Similarly follow the same for Staging and Production as per shown tabular column.

Non – Production Staging Production APIM – API Roles
APIM App Registration Name nonprod-<companyname>-apim-appreg stage-<companyname>-apim-appreg prod-<companyname>-apim-appreg

<name>.v1.ReadAndWrite

<name>.v1.Read

<name>.v1.ReadAndWrite

9. Add user accounts as “App Owner” to this App Registration.